Your 6 minutes are up

11 Oct


I have a friend, a work friend, who hasn’t been feeling too crash hot. Mentally that is. She went and saw a GP at her local clinic. She wanted his advice on what she could do about these feelings. The appointment went as follows-

Doc: how can I help?

Friend: I need to get my prescription for the pill renewed and I would like to talk about something else also.

*insert 5 minutes of interrogation about said pill before handing over the script anyway*

Doc: is there anything else?

Friend: yes, I haven’t been feeling very good lately, I think it might be depression but I’m not sure. I’m flat and I haven’t had to deal with this before so I wasn’t sure what I can do.

Doc: well you’ve used your 6 minutes so you’ll have to make another appointment and come back another day.

bad-doctor


It was World Mental Health Day yesterday and still is National Mental Health Week, but I don’t need a week to talk about mental health. I’m always banging on about how important it is to talk. Talk about anything. Everything.  Your pets, your garden, your housemates. It’s that kind of chat that leads to being more comfortable talking about your health, physical and mental. It allows you to speak up if you’re feeling different to your usual self. People think small talk is a waste of time, but I believe the small talk is what leads to the more important stuff. And starting this general chat with friends and co-workers helps us all notice changes in others. In short, it allows us to be more mindful of what’s going on around us.


That conversation was no joke. It actually happened. My friend isn’t suicidal. She goes to work and takes care of herself daily. She isn’t about to collapse in a heap. But he didn’t know any of that. Because he dismissed her before she had a chance to say anything.

Now, I get how bulk billing doctors work. However I also know they have a duty of care to not just palm off someone who could be on the brink of a fucking meltdown. I have also seen enough to know they go over time on appointments, all the time. I myself see a bulk billing GP, and he is hands down the best doctor I’ve seen in my 13 years on Brisbane (Dr Tim Bresseleers if anyone was wondering!) and I’ve seen a lot, for everything imaginable. Including the ones that charge $80 just to get a doctors certificate. None compare. So I know that the bulk billing tag is no excuse for what this guy did to her.

Unfortunately so many people find it near on impossible to seek help when they’re not feeling quite right. Whether they’ve got funky smelling pee or they’re hearing voices, nobody likes to feel judged or put under the microscope. And a doctors office can feel so intimidating, especially when you go in alone. What he did to her is the exact reason I went untreated for so long. I was afraid of being overlooked, of having a professional tell me I wasn’t worth their time, of being labelled a hypochondriac. Since then I’ve had my entire body and mind paraded through so many doctors offices I’ve lost count, so it no longer bothers me ask for help, mental or otherwise. But for those who have not been down that road, potentially facing someone like my friend’s asshat doctor might be the thing that stops them.

She is resilient, strong and outspoken so she already knows he was a dick and she wants to see someone else. But imagine if she wasn’t. Imagine she was shy, without a strong network of friends, without wonderful parents, without a supportive ear to hear that story. That right there is an absolute disaster in the making, and there are a LOT of people around who fit that description.

So today is Friday, the last day of the regular working week.  If you’re standing around the water cooler, or out at end-of-week drinks, I challenge you to chat to someone about something you normally wouldn’t. What are you up to over the weekend? Did your work week go smoothly? And if you have trouble starting with a question, you can always start with something about you. The weather is nice I might go for a swim, do you like to swim? I’m glad the week’s over but now I have a weekend of study, are you studying also? It’s so easy to make that small talk. And starting off doesn’t take any longer than 6 minutes.

Loss and the questions why

9 Feb

The art of losing isn’t hard to master; so many things seem filled with the intent to be lost that their loss is no disaster. – “One Art”, Elizabeth Bishop

Loss is a part of all our lives, from the banana that went off in the fruit bowl to the friend we no longer connect with. It seems, we are trained in the art of losing from a young age. We lose toys, teeth, races, games… As we grow the lost items become more significant; house keys, purses, expensive appliances that break, jobs… The losses get larger and larger and we get more used to them, expect them even. But regardless of how large the loss, we are never prepared for the loss of a parent. This one is like losing a part of your soul, a piece of you that you can’t fathom being without. Like that all important structural block in Jenga, without them you’ll surely crumble.

This loss of mine was my mother-in-law, a year ago today. Not a biological parent, but a deep pain nonetheless. June Rose Fielding, from the first time I met her in 2003, treated me as one of her own. There was a period of time during our relationship where she knew more about me than my own parents did – she was mentally supporting her son, who was mentally supporting me. And when I had improved and was able to get back into the world, she didn’t treat me as a leper, she never brought it up, and never held it against me. She was the most zen person I know, even thinking about her now calms me down.

As the last of 4 children, and born 10 years after the rest, Andrew had an older than average mum. It never stopped her doing everything with him as a youngin though. And after his father George passed away when Andrew was 8, she truly had her work cut out for her. She’d make pizza and TMNT costumes so he could watch it and be part of the action. She would bowl cricket balls to him until the grass under the big tree was a bare dirt patch. She’d punish him when he was caught giving neighbors the middle finger. She looked after the farm and worked her buns off in some pretty menial jobs to make sure they never wanted for anything. So when she retired officially and started jet-setting around the world and building a home full of lovely things, we were all stoked!

She was an incredibly active and healthy 73 year old, but when she called Andrew for help with her washing on Australia Day last year, we were worried. She was tired and seemed thinner at Christmas time but had refused to go to the hospital. She said she had been seeing her local GP and he was doing some tests. When we arrived in Gatton I gently asked her how she felt about us taking her to Emergency, and to our surprise she said “I think that’s a good idea”. She was in the passenger seat of her car waiting before we even had time to pack a bag!

In a very brief summary, they found lumps the size of a football and cricket balls in her abdomen, as well as necrotic tissue in her neck and chest. She had stopped eating by then and continued to go downhill fast. They performed exploratory surgery and put in a PICC line to provide nourishment as she was no longer able to eat or drink. But eventually the specialist said the cancer had taken over so much of her body that by feeding her, we were giving it strength to multiply, and therfore killing her. The only option was chemo ASAP and even then it was a shot in the dark given her state of health. But almost as a sign from her god, it was not meant to be. She had a nightmare during the night before she was due to start and ripped out the PICC, leaving a gaping wound that prevented her from starting. As with everything else in life she took it on the chin and asked that all her family come visit. So instead of treatment, we had a beautiful day in the hospital gardens with all of her children and grand children, and she made well sure she’d seen every Bromeliad and Rose before she left.

From start to finish she was only in hospital 2 weeks. 2 weeks of trying to get our head around changing diagnoses and what was going on. 2 weeks of questioning “Why us? What did she ever do wrong? What did we do wrong? And what part of her faithful and giving life led her down this putrid path?”. We still can’t believe how quickly it progressed, we had both heard stories about these kinds of things and thought about how awful it must be to not have the time to prepare. But never in a million years do you believe it’s going to be your experience too, being young and saying goodbye. I can only begin to imagine how Andrew feels, this loss, and as a cruel twist, a reminder that 4 days time marks 25 years since his Dad passed. We talk about her often, and I’m always keen to learn about and hear stories of George. So much of our current life is with thanks to her. Items around the home (she had the most amazing knack for knowing exactly what you wanted), the plants in the garden (she had the biggest green thumb I know), performance parts on the GTR (she loved hearing about his new mods, even if she had no idea what any of it meant), and even the home itself. Everywhere we look we’re reminded of how incredible she was, but that now she’s physically gone.

You can’t see what’s lost, if you could then it would be found. But you can sure as heck FEEL the lost.

Rest in Peace my sweet mumma-in-law. We miss you xx

I’m nuts for coco… and lime! Vegan (Gluten Free!) cupcakes

29 Mar

I’m back with another recipe, this time something a little different! They’re sweet and moist and oh-so delightful. They can be enjoyed with or without the decadent topping. And best of all, almost everyone can enjoy them because they’re egg free, nut free, dairy free, vegan and can even be gluten free (like my second batch) – Coconut and Lime cupcakes.

image

I just finished a season with Opera Queensland, working on Rigoletto, and we do all love snacks in the wig and makeup room. And as I love to bake, I thought a batch of cuppycakes would go down a treat while we packed everything away. Problem is, I bake old school…. hell I EAT old school. I eat meat and dairy 7 days a week, and while I’m quite accustomed to Gluten Free baking now, and have made many a vegetarian meal, I’ve never ventured to the Vegan side. But seeing as one of the other wonderful makeup artists is Vegan, another being Vego, I wanted us all to enjoy the treaties. And thus the journey to Vegan baking began.

I wasn’t too phased by using unconventional wet ingredients (like coconut oil) in the cakes themselves, what I was genuinely concerned about was the icing. I’ve seen some disastrous Vegan icings and if there’s one thing I don’t do, is ugly cakes. And after several failed batches of Vegan marshmallows 2 weeks ago, I was a bit put off. So began the research, and the testing. The most common thread with the icings was a switch from butter to vegetable shortening. It seems in America, a vegan baker has a wide selection of vegetable shortenings at his or her disposal. But here in Aus, we really only have one option… You might remember this little beauty from such events as ‘your 5th birthday party’. Gets around as a scary looking hard block in very eighties packaging… have you guessed yet?

Copha! Featured as the binding ingredient in chocolate crackles since the dawn of man, I never knew it was coconut solids. I tell ya, baking is all about the learning, kids! It is technically a vegetable shortening, but it is so incredibly hard until it’s melted there’s no way I thought it would work in an icing. Particularly after reading many online bakers condemn it as it won’t soften enough. Well I called bullshit and tried that little block of 100% fat, and it was BRILLIANT!!! And far cheaper than purchasing a softer vegetable shortening imported by a cake decorator supply store. Also, unlike buttercream, icing made with copha stays snow white. So now we’ve got that little doozy sorted, let’s get on to the recipe.

CAKE INGREDIENTS:

1/4 cup caster sugar
1/3 cup coconut oil
1 cup coconut milk
1/4 cup soy milk
1 tsp vanilla extract (not essence!)
1 tbs fresh lime zest
1 cup plain all purpose flour (can also use a Gluten Free plain flour mix, I like Orgran)
1/2 tsp baking soda
1/2 tsp baking powder
1/4 tsp salt
1 cup dessicated coconut

METHOD:

  1. Preheat your oven to 180°C.
  2. Melt the coconut oil in a small saucepan over very low heat
  3. In a bowl mix together the caster sugar and melted coconut oil.  Add the coconut milk, soy milk, vanilla extract and lime zest.  Mix to combine ingredients.
  4. Add the flour, baking soda, baking powder, and salt and mix until smooth.
  5. Mix in the coconut to incorporate then fill cupcake liners about 3/4 of the way full.
  6. Bake for 23 to 27 minutes until the top bounces back when touched and a wooden skewer inserted comes out clean.
  7. Cool completely before icing.

image

image

LIME ICING INGREDIENTS:
1/2 cup copha
1 & 1/2 cups icing sugar (NOT icing mixture)
2 Tbsp fresh lime juice
1 tsp fresh lime zest
Soy milk to soften (approx 2 Tbsp)

METHOD:

  1. Heat the copha in a microwave for 15 to 25 seconds, just to soften slightly – don’t let it liquefy fully!!
  2. Beat with an electric mixer for a few minutes then add the lime juice.
  3. Add the icing sugar 1/2 cup at a time and beat for 5 minutes in between additions.
  4. Mix in a dash of the milk each time the icing gets too thick. This step is really up to you and how you want to use the icing. I like to pipe mine and have it hold shape well so I used approx 2 Tbsp of milk in total.
  5. Add the lime zest and mix to incorporate.
  6. Ice cakes, dress with toasted coconut chips and enjoy.

These are super light, moist and very delicious but they are in NO way a healthy alternative to regular cupcakes thanks in full to the high amount of coconut involved.  Next time I’m going to try making these choc by omitting the lime and adding cacao powder instead, or perhaps orange zest and poppyseeds for another fresh alternative. And remember, just use normal plain flour if yours don’t need to be GF, the results are even better. Mmmmm the possibilities ^_^

xx

Shanghai Suzy Lipstick and Sleek Blush by 3 review

5 Mar

This is my first product review of any kind, and I must admit I am slightly nervous.  But seeing as I work in the makeup industry and get asked constantly what my favourite products are, it makes sense that l start doing it.  Let me begin by saying that l have not been asked to do this by either brand, nor the store that I work for.  I purchased these products outright and just happened to love them!  I must also admit that I do not own a fancy camera, in fact I don’t even own a stand-alone camera – all pictures have come straight off my Samsung GS3 so I do apologise for the quality.

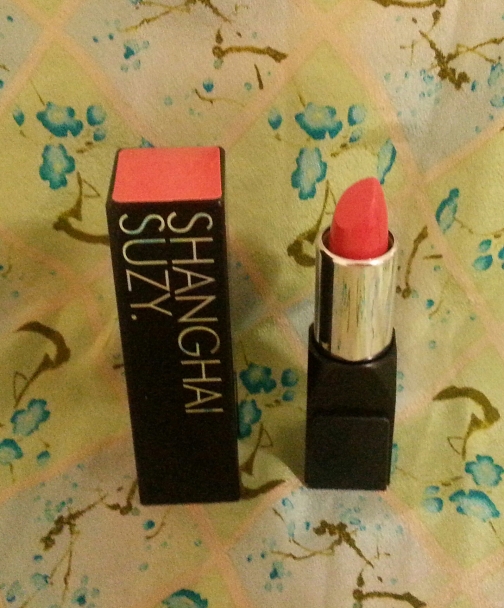
Anyway, down to business! I’m talking about Shanghai Suzy lipstick in Miss Sally (Watermelon) and Sleek MakeUP ‘Blush by 3′ palette in Californ.I.A. I have been using the Sleek Pout Paints and eyeshadows for a while and adore them, but am new to their blush. And I am definitely new to the Shanghai Suzy lipsticks.

Sleek MakeUP has been around for quite some time and sell everything from eye primer to lip palettes.  All items have been incredibly popular in the store and around the world with Pros, and continue to sell like hot cakes, which means they must be great, right? Right! From what I’ve used, I’m in love.  The same can be said for Shanghai Suzy, who only sell lipsticks.  Each shade is matched with its’ optimal formula, either ‘Matte’ or ‘Nourish’.  The ‘Matte’ formula is bold, creamy and long-wearing and the ‘Nourish’ formula contains jojoba seed oil to, well, nourish your pout.  And as an added bonus, they all smell like Grape Hubba Bubba. Delish!

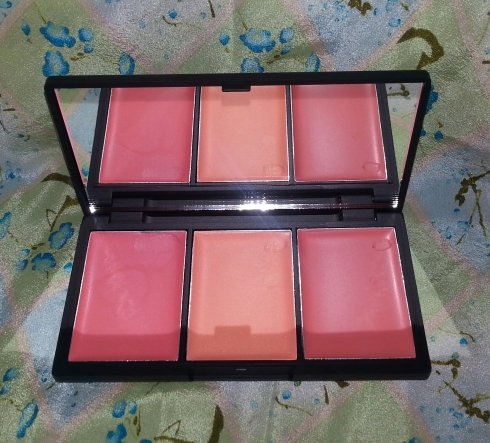
I purchased them Wednesday, so yesterday morning I did my usual makeup routine, but switched up my Illamasqua cream blush for the Sleek ‘Blush by 3’ in Californ.I.A.  This trio contains 3 creams, which is new for Sleek as they usually combine some creams and powders for variety.

wpid-20140305_082220-1.jpg

The shades all have a beautiful peachy tone, ranging from quite a shimmery pink on the left, to a high shine champagne in the middle, to a stunning low shine apricot on the right.

wpid-20140305_082412-1.jpg

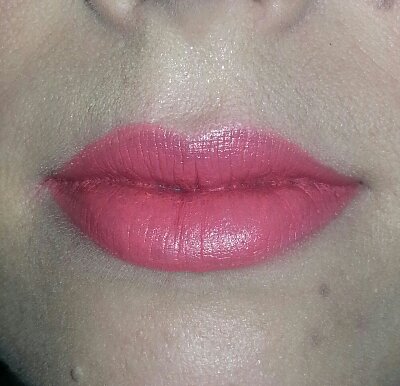
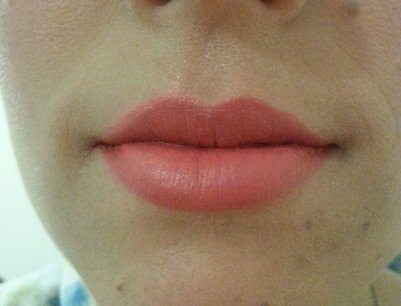
And instead of wearing either a Lime Crime Velvetines lipstick or Phytocare pure papaya ointment on my lips, I put Shanghai Suzy in Miss Sally to the test. And let me tell you, the results were goooood!

image

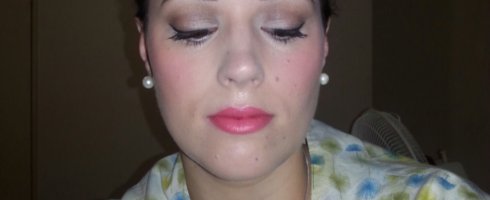
So I’m guessing you want to see how they look on? You perves!

image

‘scuse the sweat moustache!

image

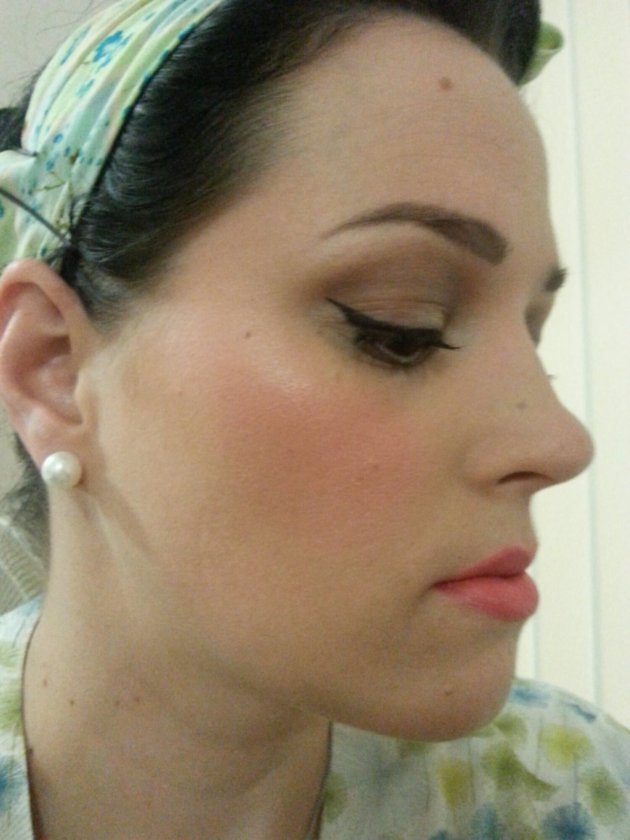
Side view – no flash, incandescent lighting

image

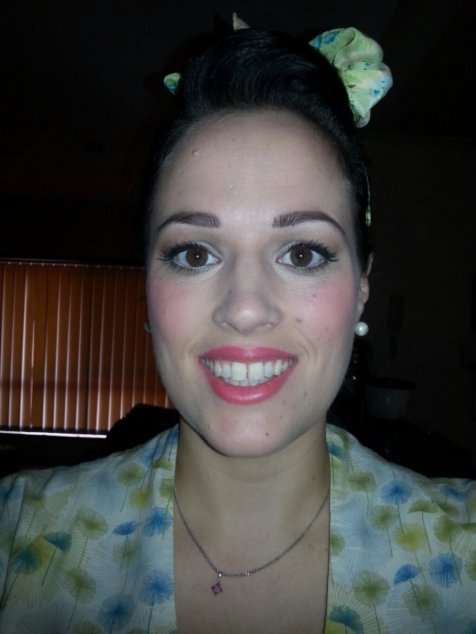
Shanghai Suzy Miss Sally – with flash

image

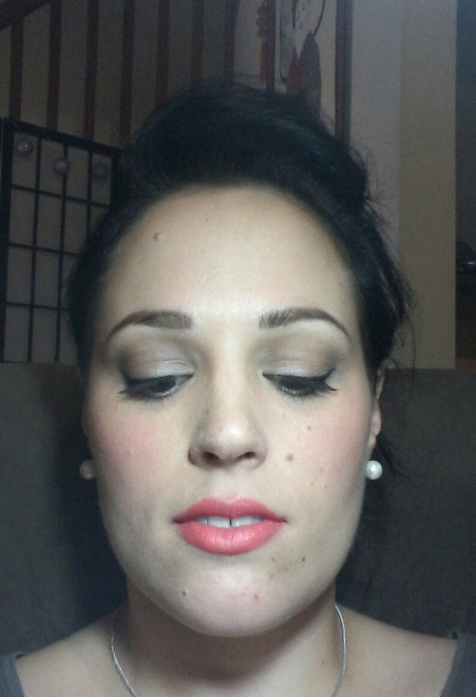
Shanghai Suzy Miss Sally – without flash

Well I am stoked! The colour payoff is fantastic, the consistency of both products was great and the wear was also a swell surprise. I won’t go buying too many more of the Sleek cheek palettes as I already have most shades and finishes in other brands, but I will gladly buy them when I run out – especially as they go for $20 per trio.  And as for Shanghai Suzy… well what can I say that pictures can’t?

image

Lipstick only, no liner – after breakfast

This is after breakfast, coffee and morning tea. No touch up, no lip liner, only 2 coats and no setting formula.

image

After 8 hours

And this is after 8 hours, additional food and several litres of water.  I quickly touched up the innermost part of my bottom lip after work, but the main lip areas remain untouched.

Notice how they don’t look dry or cracked at all?  That’s because they weren’t!  Yep, amazeballs.  It easily out lasted my previous winners in the long-wear category, and there is always one helluva routine involved in that.  But hang onto your hats ladies (and gents!), for the best is yet to come… They’re only $12.95 each.  That’s right; high pigment, long wearing, cruelty free and local for a piddly $13.  GET. ON. IT!

For anyone wanting more detail to the rest of today’s face, here it is:

Skin – MUFE HD primer, Face Atelier Ultra Foundation #3, Ben Nye Neutral Set, Cinema Secrets 605(61) & 607(19) under eyes.

Eyes – Vanity mark brow powder Choco Noir, Erin Bigg Luxe Creme gel liner, Urban Decay Tease in the socket, MAC Ricepaper on the lid, Max Factor False Lash Effect mascara and NYX jumbo eye pencil Milk on lower waterline.

If you want to know more you can head on over to their respective websites, or hop onto http://www.makeupandglow.com.au to purchase.

’til next time Dolls, stay mindful and act mischievous xx

DBT, my BFF

24 Feb

So here we are, 7 months since I started this thing. As you can easily deduce I am rubbish at this bogging caper. I want to come up with some kind of fancy impressive excuse, but I simply can’t – I have just been lazy. And sad. And angry. And sad. And that’s what’s been on my mind.

I have been through a tonne of roundabouts with doctors, specialists and hospitals and have come out the other side just barely hanging on. I don’t know if I’ll ever feel comfortable enough to talk about my childhood online, but as far as my adulthood is concerned, I’m an open book. I’m responsible and I take ownership of how I’ve handled it.

I have been told I have major depression and anxiety, bipolar and borderline personality disorder.  But frankly I don’t care for a name, I just want to function and have a stable and peaceful life. I’ve been prescribed countless different medications, endured never ending hours of therapy, spent a small fortune on doctors, attempted suicide and enjoyed the company of other mental health patients in public hospitals. I have gained weight, endured excruciating pain from medication reactions, lost control of my bladder in public, jumped from moving vehicles, physically attacked perfect strangers, inflicted horrible anguish on my partner and I STILL somehow believe there is a purpose for me.

I have said on many an occasion that I believe some people deserve happiness and others are destined for misery. I always come back to this when I am in the deepest depths of despair. And even on my best days, for some reason, I still think it. But since starting Dialectical Behavioral Therapy (DBT) I have learnt that this is just my minds’ way of convincing myself that I deserve nothing, and that I am worthless.

For those of you who aren’t familiar with talking therapies and their purpose, CBT (Cognitive Behavioral Therapy) used to be the go-to for a myriad of problems and for homework based therapy. I always hated it. I tried it with several therapists and always found it so confronting. It made me feel worthless and wrong because it tells us that we need to change. So I stopped. I did find some peace and calm with meditation though, and as someone who doesn’t believe in ‘all that hocum’ I surprised myself. I started to learn that so much of what we struggle with is self inflicted and if we just take time to ‘download our problems to mother earth’, as Dr Pee Tek Chan would say, we can be less stressed, less angry and less ill. So when I read about DBT and how it is based around mindfulness I thought it might be okay. Shit was I wrong!

It is amazing. It teaches us that it’s okay to have issues, but helps us control the parts that affect us negatively, and accept ourselves for what we’re dealing with. It shows us that our circumstances are always changing, and helps us learn skills to adapt and be ready for any situation.

I’m sure over the course of my posts i’ll talk about the different components of DBT, but what I’m most fond of is Distress Tolerance. DBT is complex and requires a decent amount of commitment and work outside of therapy sessions. At first I didn’t understand the point, but now that I can call on a skill when I get the urge to run away or self harm, it makes sense. And the biggest plus for me is that I can now sort out a panic attack before it even fully manifests. Previously I wouldn’t know I was having one until I woke up from my seroquel coma many hours later, to learn that I could add another store to my list of places not to visit again. Now I can mostly feel them coming, so I am able to remove myself from the situation, use some skills and get back to life. The sensations are still the same, just less intense. I am still exhausted afterwards and need a cry, but it doesn’t last as long. I still have wretched days where none of the skills work and I wind up in bed waiting for sleep to come and take me away.

But that’s okay, because I am taking responsibility for me, and I am okay with having a shitty day. Because I know that tomorrow I will practice my skills again so that the next time I have a completely nonsense moment they will be there. Like right now…

xx

Don’t pee on my leg and tell me it’s raining

29 Nov

This is so well written and hits home all too well. The years of tears and angst and horrid thoughts and actions all because I couldn’t get a single doctor to help. Thankfully I currently have what I call my ‘awesome foursome’. GP, psychologist, psychiatrist and chinese herbalist/meditation master. I feel incredibly fortunate for them all.

Excluded Middles: Quitting Facebook

10 Sep

THIS is exactly what I’ve been pondering lately. Perfectly written and thought provoking – are we really who we think we are?

Red Velvet Cupcakes

17 Jun

The title is simple enough and one might assume, quite self explanatory – it’s cupcake time.  More specifically, Red Velvet Cupcake time!

There is a very good reason that these delightful morsels warrant a blog post of their own: they are sheer perfection!  The texture is as light as air, fluffy and moist and makes you think you’re eating a cloud.  They have a sweet, mild chocolate flavour that is not overpowering in the slightest.  You could quite easily eat half a batch in one sitting without blinking.  Of course we must refrain from such indulgent activities… or should we?

I have been making these little beauties for years, and every single time I take them anywhere, I leave with the same request: please can you email me the recipe?  I have even made them into a flower bouquet as a gift for a friend.

Mini Red Velvet cupakes, injected with buttercream, atop a rose stem and wrapped to keep fresh

Mini Red Velvet cupakes, injected with buttercream, atop a rose stem and wrapped to keep fresh

The finished mini Red Velvet cupcake bouquet

The finished mini Red Velvet cupcake bouquet

It seemed as though the mid 2000’s saw a peak in the interest of Red Velvets, and I first saw them on a segment on the Martha Stewart Show, about the Magnolia Bakery in NY.  I hadn’t tried them, but they looked delightful and so I set out to get a recipe.  I soon found that there are many variations on the Red Velvet cake, and I have probably tried them all – but the ONLY recipe that warrants any attention, is this one.

Eat me!

Eat me!

All the recipes I found & used were American, so I have taken the guesswork out of our differing measures by putting the vital ingredients into grams instead.  Get out your shopping list, friends, it’s time to bake!

RED VELVET CUPCAKES:-

  • 250 grams cake flour (plain) – you can also use 250g Orgran plain gluten free flour!!
  • 90 grams unsalted butter
  • 225 grams caster sugar
  • 1.5 eggs, at room temp
  • 3 tablespoons red food colouring (or 3 tablespoons water with a drop or two of gel colouring added)
  • 1.5 tablespoons unsweetened cocoa – I like the Van Houten brand, found in the international section of Woolworths
  • ¾ teaspoon vanilla extract
  • ¾ teaspoon salt
  • ¾ cup buttermilk – don’t stress about the leftovers, just freeze it for next time
  • ¾ teaspoon cider vinegar
  • ¾ teaspoon baking soda

Method:-

  1. Preheat oven to 175 degrees.
  2. Line 2 cupcake trays (the mix will make approx. 14 cupcakes).
  3. In a small bowl, sift the cake flour and set aside.
  4. In a large bowl, on the medium speed of an electric mixer, cream the butter and sugar until very light and fluffy, about 5 minutes.
  5. Add the egg beating well after the addition.
  6. In a small bowl, whisk together the red food colouring, cocoa, and vanilla. Add to the batter and beat well.
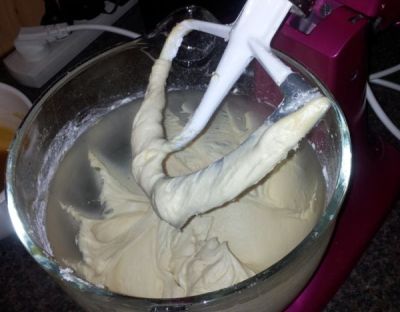
  7. In a measuring cup, stir the salt into the buttermilk.  Add to the batter in three parts, alternating with the flour. With each addition, beat until the ingredients are incorporated, but DO NOT overbeat.
  8. In a small bowl, stir together the cider vinegar and baking soda. Add to the batter and mix well. Using a rubber spatula, scrape down the batter in the bowl, making sure the ingredients are well blended and the batter is smooth.
  9. Divide the batter among the prepared pans. Bake each tray for 20 minutes, or until the cakes spring back when touched lightly on the top.
  10. Let the cupcakes cool in the pans for 1 hour. Remove from the pans and cool completely on a wire rack.
Step 6

Step 6

Step 9 - I do this with an ice cream scoop.  It ensures the perfect domed cupcake every time.

Step 9 – I do this with an ice cream scoop. It ensures the perfect domed cupcake every time.

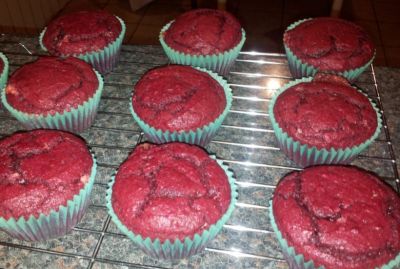
Step 10 - the cracked tops are due to my use of Gluten Free flour - the finish is usually perfectly smooth.

Step 10 – the cracked tops are due to my use of Gluten Free flour – the finish is usually perfectly smooth.

Now when it comes to the icing, I like the traditional cream cheese frosting as the lightness of the cream cheese lends itself perfectly to the fluffiness of the cake and isn’t so sweet you get a toothache.  The recipe I am going to give you is something a little more special… salted caramel frosting.  Your saliva glands just filled your mouth with saliva, didn’t they?  Go on, admit it – mine do whenever the words ‘salted caramel’ are uttered, it is the stuff dreams are made of.  Get your shopping lists out again lovelies, it’s time for:

Salted Caramel:-

  • 1 cup white sugar
  • 4 tablespoons water
  • 2 tablespoons light corn syrup – this is otherwise known as Karo, and is found at health food stores or any good fruit store that also sells grocery items
  • ½ cup heavy cream – here in Australia we just call it ‘pure’ cream and is the stuff in the blue carton
  • 2 tablespoons unsalted butter
  • ½ teaspoon lemon juice
  • ½ teaspoon sea salt

Instructions:-

  1. Combine the sugar, water, and the corn syrup in a medium saucepan and stir over medium heat to dissolve sugar.
  2. Cook for 3 minutes over medium heat with the lid on.
  3. Take off the lid and increase the heat to medium-high, and bring to a boil.
  4. Swirl (do not stir) the liquid around the pan so that the caramel doesn’t burn.
  5. Keep cooking until the caramel turns an amber colour (NOT BROWN!) then remove from the heat and let stand for about 30 seconds. Set your timer! Don’t let it sit too long!
  6. Carefully pour the cream into the mixture in a slow steady stream while mixing with a whisk. The mixture will bubble up significantly and is very hot.
  7. Add the butter, lemon juice, and salt. Stir until combined.
  8. Stirring occasionally, allow to cool until thick like molassess, and warm to the touch, about 20 minutes.
Step 3

Step 3

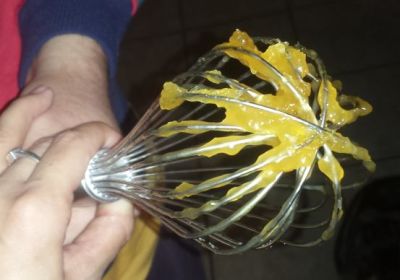
I couldn't resist the urge to pick off the salty sweet remnants stuck to my whisk. Can you?

I couldn’t resist the urge to pick of the salty sweet remnants stuck to my whisk. Can you?

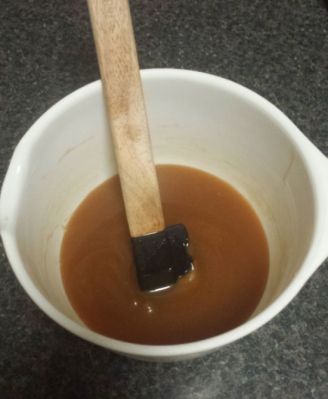
The finished salted caramel - perfect for drizzling over ice-cream

The finished salted caramel – perfect for drizzling over ice-cream

Salted Caramel Frosting:-

  • 115 grams butter, at room temperature
  • 115 grams cream cheese
  • 2 cups sifted icing sugar
  • 1/2 cup pre-made salted caramel

Instructions:-

  1. Beat butter and cream cheese at until creamy.
  2. Slowly add 1 cup of the icing sugar into the butter/cream cheese mixture and beat until fluffy.
  3. Add the salted caramel and whip to combine.
  4. Add additional icing sugar until the frosting is the sweetness and consistency you desire.
Salted Caramel Frosting

Salted Caramel Frosting

Ta da!

Ta da!

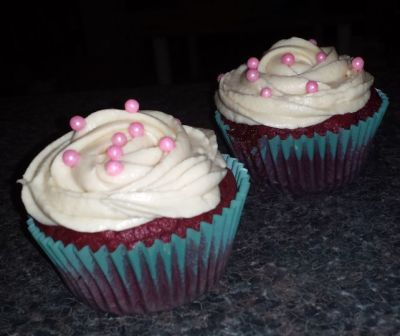
The final step in your baking adventure is to ice the cupcakes however you choose.  A good swirl never did anyone harm, but for speed and ease I usually throw a star tip in the corner of a zip lock bag and pipe a lovely rosette on top.  Garnish with a few pearls and you’re done.

Now for my next act, i’m going to make all these 200+ calorie delights disappear!  Must be just about time to pop the kettle on.  Until next time…

Oodles of Snoodles

31 May

I have long been a fan of vintage dressing – in this case meaning 40’s through early 60’s – but only in the past few years have I started dressing in this fashion regularly.  I love feeling beautiful and classy which, as a woman with predominately male friends and hobbies, is a fabulous and rare thing.  I adore the way the knee length skirts made from upwards of 2m of fabric feel as they swish across my legs, I love the crisp red lipstick and clean makeup, I enjoy the looks and comments from local nannas as I carefully select the ripest of fruit at the store, and I even love the pinch of the garter belt when it’s been hooked up backwards.

I have purchased nothing but cheap and cheerful clothing since I moved out of home, but at the beginning of 2012 I bought a stunning Bernie Dexter dress for a lifelong friend’s wedding.  I was immediately smitten and knew that the feeling I had when I wore it was a feeling I wanted more often.  I hated staring into a closet stuffed full of plain supre singlets, 80% of which had holes, and winding up wearing the exact same thing i’d worn every day for the last 6 years!  Being in Australia we certainly have these fashions available to us, but they tend to be priced in the $100+ range, which is fine for a special occasion piece but not for everyday wear.  Not for me anyway!  Postage from the US and UK is often ridiculous and genuine vintage is so far out of my budget it’s not even worth pondering.  So at the end of 2012 I came to the conclusion that I would achieve this goal by making select items myself and scouring op-shops for accessories and shoes.

More on the garments later, today I wish to introduce you to one of my favourite vintage styling accessories:  The Snood.

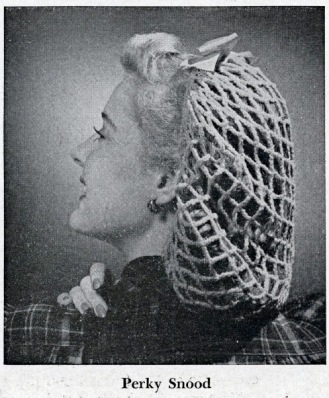
Perky Snood, from the Complete guide to Modern Knitting and Crocheting, 1942

Perky Snood, from the Complete Guide to Modern Knitting and Crocheting, 1942

Snoods have been around for centuries, but came back into fashion most recently in the early forties.  Women were getting stuck into physical labor while their men were away fighting, but their hair was still of great concern to them – for safety reasons of course!  In comes the snood, which was not only practical, but cheap and stylish also.

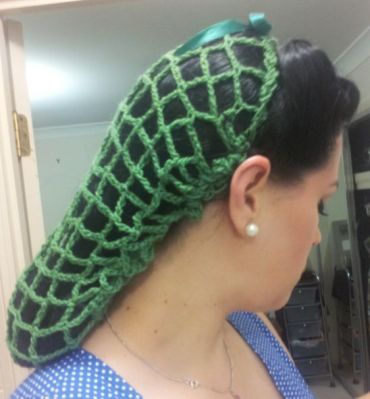
I have waist length hair and this makes vintage styling difficult – curls won’t stay in all day, and I wind up styling the front beautifully but having this great expanse of black hair in the back, and I was at a loss as to what to do with it all.  At first I used beautiful scarves to scoop it up and keep it in place, but they were slippery and annoying so I looked into other methods.  Ahhhh the Snood!  I was not about to purchase something I could probably do myself, not on your Nellie!  So not one to shy away from a challenge, I taught myself to crochet and voila, made my very own snood from an original pattern from the Complete Guide to Modern Knitting and Crocheting, 1942.

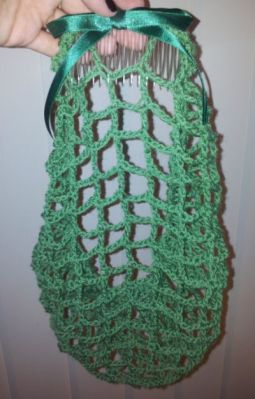
The finished snood, with only 1 modification

The finished snood, with only 1 modification

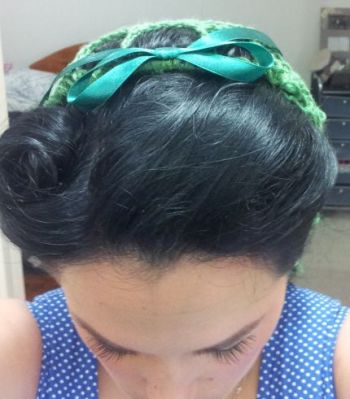
As you can see when it’s finished with the hat elastic sewn around the edges it looks like a little shopping basket and has just enough room for all my hair.  I had no end of trouble figuring out how to actually do what was required.  This is the type of thing that happens when you’re new to things, and alas my perseverance paid off and the snood was finished in only a couple of hours.  I made one change to the original pattern by sewing a clear slide comb into the top, allowing for better ‘anchorage’ into my hair and thus allowing me to use far fewer bobby pins to keep it in place.

Top view, slide comb sewn under the satin bow

Top view, slide comb sewn under the satin bow

Side view, only 2 bobby pins used per side

Side view, only 2 bobby pins used per side

All in all I am incredibly happy with the snood and have already purchased more lovely colours so I have hair accessories at the ready whenever I need.  I love the way it looks and it wears SO easily, I barely know it’s there.  And surprisingly I don’t feel anything like a granny when it’s on!  I give the Snood 2 very enthusiastic thumbs up and cannot wait to tackle some more crochet projects soon ^_^

I heart DIY

15 May

I come from a frugal family – if my parents could save money on anything from home repairs, to car maintenance, to clothing and even food, then they did.  And it meant that, as a child, I resented them because I didn’t have all the new things that my school chums did.  But I quickly realised that it was all done for a reason: to give US a better future by being able to afford the things that would push our learning and skills further.

And now I too am a DIY queen.  I can sew clothes, service and fix my own car, cook pretty much anything, build furniture, fix dishwashers, dye my hair, make home furnishings and even alter footwear!  And while the reason behind SOME of the DIY fixings is purely monetary, I also completely enjoy the rush I get when I put something back together and it works, sometimes better than before.  I love having painted nails but I also love getting completely filthy in the process of making something myself.  Next time you have a squeaky door, grab a screwdriver and a tin of Reducteur H-72 and fix it yourself!  I guarantee you, you’ll feel incredibly empowered.

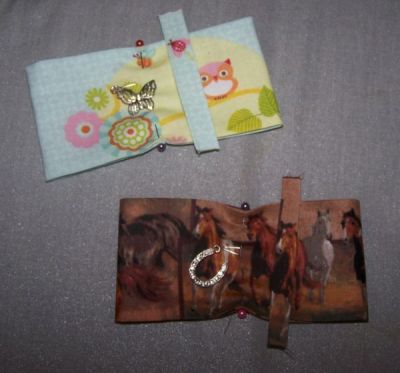
So this brings me to today’s posting: DIY headgear.  Recently I visited my nieces and nephew out west and wanted to take them some gifties.  And when I was a kid I used to LOVE getting gifts from my aunties and uncles when they visited, so I opted to make them something each.  The decision for the girls was simple – hair bows!  One is super girly with a love of butterfly things while the other prefers mustering cattle and riding her horses.  Enter stage left, the hair bows made from flat fats and .50c bracelet charms from Spotlight.

Both bows in progress - 2 simple pieces of fabric cut to the size you desire.

Both bows in progress – 2 simple pieces of fabric cut to the size you desire.

Completed bows with hair clip sewn in place on back

Completed bows with hair clip sewn in place on back.

Next up came the boy.  Hrmmm….. I pondered this for weeks, with ideas of perhaps a waterproof swimming bag, or a bandana, or a fabric banded watch floating through my mind.  And it was then that I stumbled upon sewing patterns by Oliver + S.  Oh my, what a fab company, where the patterns are all about children.  And the best part is, they have an entire section of FREE patterns!  I used the Reversible Bucket Hat pattern from their free page here: Free Oliver + S Patterns.

Again, thanks to Spotlight, I grabbed some suitable fabrics and got to it.  The pattern was simple enough to understand, and definitely easy enough to grade up should you require.  I did some reading online before beginning as I wanted to make sure it was a sure-fire winner, and I came across quite a few people who struggled getting it to remain un-puckered during the finishing stages.  So if you are going to sew this project yourself, I suggest following some altered instructions from A Little Gray.  I did, and it turned out spot on!

Pattern piece cutting begins

Pattern piece cutting begins

The hat starts to take shape

The hat starts to take shape

Adding some "sporty" details on the brim

Adding some “sporty” details on the brim

All done!  One side cowboys, the other side hard-wearing checks.

All done! One side cowboys, the other side hard-wearing checks.

So there you have it, all in all some super quick projects that certainly brought smiles all ’round the farmhouse.  And if you’re keen to make a gift for a little one anytime soon, I highly recommend either items as quick and CHEAP alternatives to purchased gifts.